Example: Pulsed X-Band Operation
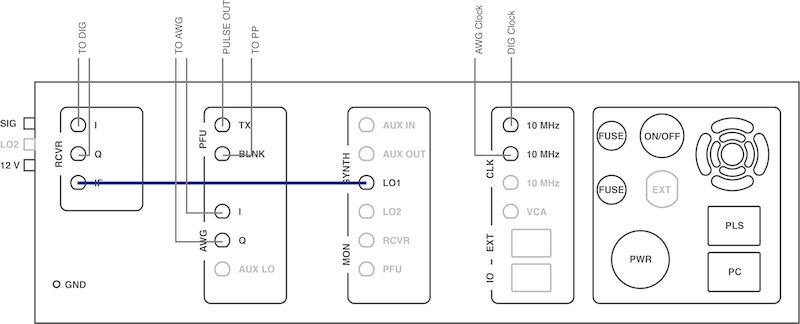
Example configuration for pulsed X-Band EPR spectroscopy.
A typical configuration of the X-Band IF system for pulsed X-Band spectroscopy is shown in the figure below. Connections that are not required are greyed out.
| Connector | Description |
|---|---|
| RCVR IF to LO1 |
Connect a microwave cable between the LO1 synthesizer output and the RCVR IF input. This has to be a microwave cable, able to carry frequencies up to 10 GHz (Suggested Cable). This is the default configuration when using digital demodulation and offsetting the pulse frequency using the AWG. |
| RCVR I RCVR Q |
Connect the RCVR I and RCVR Q channel to the digitizer or oscilloscope. The EPR signal will appear here. |
| AWG I AWG Q |
Connect the AWG I and AWG Q connectors to the arbitrary waveform generator. Alternatively, these channels can also be connected directly to the output of a pulse programmer to generate rectangular pulses at the LO1 frequency. If you have questions about these mode, please contact Bridge12 at support@bridge12.com. |
| PFU TX | This is the output of the X-Band IF system. Connect this connector to the input of the high-power pulse amplifier. Depending on the type of the amplifier an additional pulse blanking gate is required as a channel of the pulse programmer. |
| PFU BLNK |
Blanking gate of the PFU. This is not the amplifier blanking gate. This gate is active high and needs to be high to be able to transmit microwave pulses. |
| 10 MHz CLK |
Connect the system clock to each, the digitizer and the AWG. That way, the X-Band IF system provides the master clock to synchronize all other instruments. The X-Band IF master clock runs at 10 MHz. In cases when the AWG clock is higher, the user may want to synchronize the system to the AWG clock to minimize pulse jitter. |
Last modified March 4, 2024: Adding Magnet and iVTI Operations (b0b96c4)