Controlling the MPS from OVJ
How to use the OVJ panel to control the MPS
The Brigde12 MPS can be completely remote controlled from within OVJ. Make sure, the MPS is connected to the computer running OVJ using a USB cable.
The Bridge12 MPS is controlled from a dedicated panel within OVJ. To access the panel:
- Select the tab label Start from the panel
- Click on MPS to access the panel
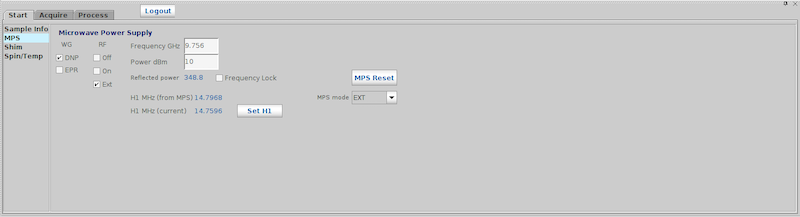
Most controls in this panel are labeled identically to the front panel labels of the MPS.
- WG: This check box controls the waveguide status. OVJ will allow the use to only check one box at a time. For example, if the DNP box is checked, the EPR box will be unchecked and vice versa.
- RF: This check box controls the microwave power output status:
- Off: The microwave power is disabled
- On: The microwave power is enabled
- Ext: The MPS is waiting for an external trigger signal to enable the microwave power
- Frequency (GHz): Microwave frequency in GHz
- Power (dBm): Microwave power in dBm. If your are not familiar with the dBm scale, a conversion table is available in the MPS documentation
- Reflected power: The value printed here indicates the amount of reflected power from the cavity.
- Frequency lock: This check box enables the software-AFC feature of the MPS.
- MPS Reset: This will trigger the MPS to reboot.
OVJ calculates the 1H frequency from the microwave frequency that the MPS is set to. It is displayed as H1 MHz (from MPS). The frequency is given in MHz. Under it, the current OVJ 1H frequency is given. In most cases, these two values should be close. To set the spectrometer frequency to the calculated 1H frequency from the MPS, hit the button labeled Set H1.
Last modified September 17, 2023: Updating DNP section (d275871)