Probe Mounting Bracket
Some liquid cryogen-free cryostats require a mounting bracket to securely hold the probe in place and to dampen vibrations caused by the cold head. A support bracket is available for all Bridge12 EPR probes. Please reach out to support@bridge12.com if you require a support bracket.
The support bracket is mounted on the probe and securely locates the probe between the magnet coils.
Required Tools: The installation of the support bracket does not require any special tools. To secure the lock nuts, a wrench/spanner (size 7/16 or 12 mm) can be used.
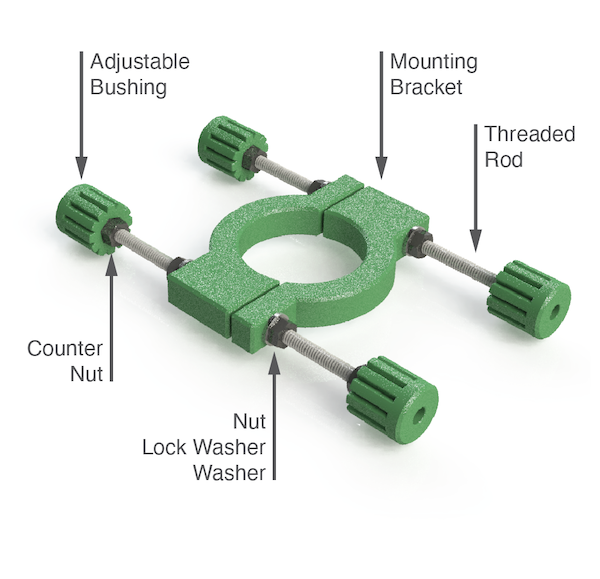
Parts of the Support Bracket Assembly
The mounting bracket assembly consists of the following components (refer to the figure):
| Part Name | Quantity | Replacement Part |
|---|---|---|
| Mounting bracket | 2 | Contact Bridge12 |
| Threaded rods (1/4-20), cut to desired length | 2 | McMaster-Carr |
| Adjustable bushing | 4 | Contact Bridge12 |
| Washers | 4 | McMaster-Carr |
| Lock washers | 4 | McMaster-Carr |
| Nuts (size 1/4-20) | 8 | McMaster-Carr |
Installation of the Support Bracket
To install the support bracket follow these instructions:
- Place the mounting brackets around the flange adapter of the probe (stainless steel section of the probe top).
- Insert both threaded rods.
- First add 4 washers to the threaded rods, followed by 4 lock washers. Make sure the probe with the mounting brackets is roughly centered.
- Add 4 nuts to each end of the threaded rod. These nuts are used to compress the mounting brackets around the flange adapter of the probe top. Screw the nuts all the way to the clamp. However, don’t tighten the nuts before the final position of the probe is set correctly.
- Add 4 counter nuts to the threaded rod and screw them in so they are approximately half way between the nuts that compress the mounting brackets and the end of the rod.
- Screw the adjustable bushings onto the threaded rod. The side with the nut should face the mounting bracket. Screw the bushing in until the threaded rod is almost sticking out on the opposite side. Repeat this for all 4 bushings.
Note
The adjustable bushings have a nut that screws onto the threaded rod. Sometimes, this nut can fall out ouf the bushing. Please make sure that there is a nut inside the bushing otherwise the bracket can not be secured between the magnet coils.
- With the mounting bracket installed on the probe, insert the probe into the cryostat. The probe should be roughly at the correct height. If you are using the optical window, make sure the optical window of the cryostat and optical access of the probe are roughly aligned.
- Make sure the probe is centered and the distance between the adjustable bushings and the outside of the magnet coils is roughly the same on both side.
- Use the wrench to tighten the nuts to secure the mounting bracket around the probe top. Avoid overly tightening the nuts as this could damage the mounting brackets. The lock washers do not have to be completely compressed, but the mounting bracket should stay securely on the probe top.
- Screw out the adjustable bushings until they almost touch the side of the magnet coil. Repeat this for all four bushings. You should still be able to move the probe up and down between the magnet coils.
- Pull up the probe to the correct height and turn the adjustable bushings to securely lock the probe between the magnet coils. This is most easily done by two people. One person to hold the probe in place, while the other person adjusts the bushings to lock the probe in place. To avoid damages to the magnet coil, don’t overtighten the bushings.
- Once the probe support bracket is in place, screw the