Tuning the Resonator
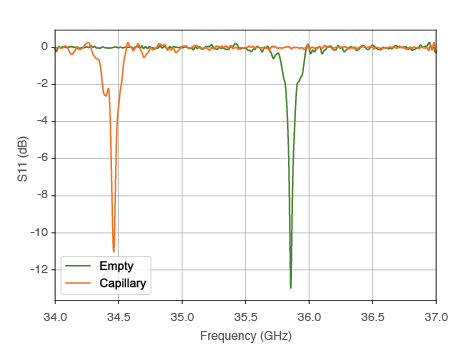
The frequency of the empty resonator is typically between 35.5 and 36 GHz. This may be outside of the normal operating frequency of a typical EPR spectrometer, however, inserting the sample into the resonator, this will shift the frequency to lower values (dielectric loading) as shown in the figure below. The amount of the frequency shift depends on the size and material of the sample capillary and the nature of the sample (e.g. polymer at room temperature, frozen aqueous solution, etc.). Please see the section Consumables for the recommended sample size.
QLP Frequency Shift
Due to the nature of the resonator, the resonance frequency will not noticeably change when cooling down to cryogenic temperatures.
Important
If you have already samples that are loaded into a smaller capillaries, we recommend placing the existing capillary into the WG-221T-RB sample tube to shift the resonator frequency to the correct regime.
Iris Coupling
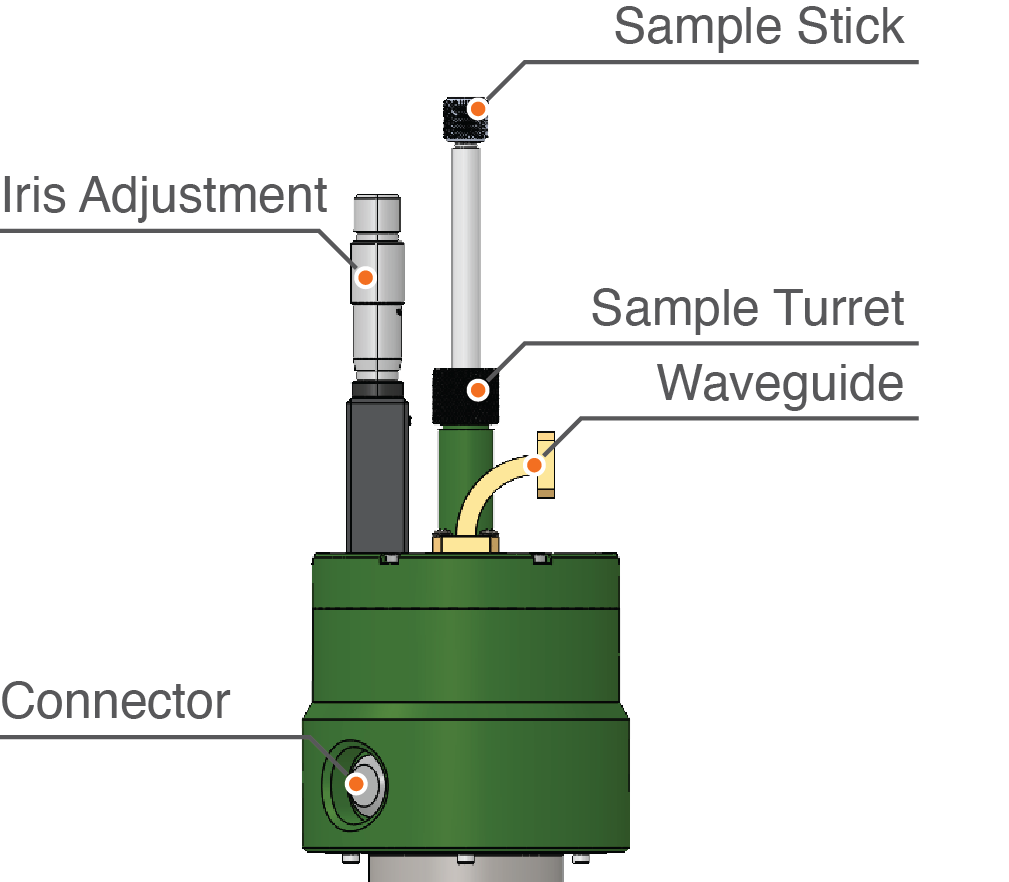
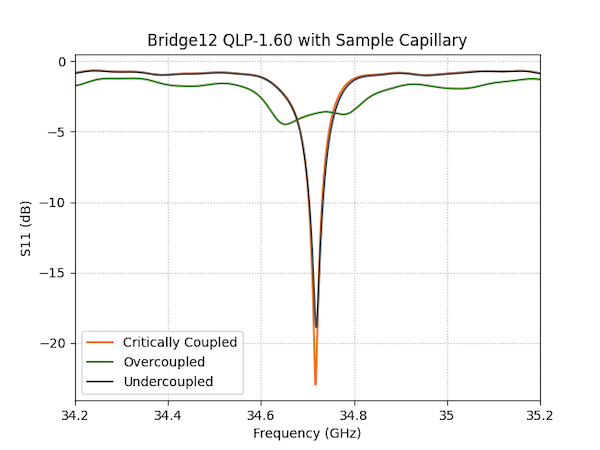
The microwave coupling to the resonator is adjusted using an iris. The iris can be mechanically controlled using a micrometer screw head, located at the top of the probe (Iris Adjustment, see figure above). By turning the micrometer screw, the iris is moved up and down and the resonator coupling can be changed from undercoupled to critically coupled to overcoupled as shown in the figure below.
QLP Iris Adjustment
Typical Q values and conversion factors for the overcoupled and critically coupled resonator:
| Parameter | Value |
|---|---|
| Microwave Conversion Factor (critically coupled) | > 12 G/sqrt(W) |
| Bandwidth (critcially coupled) | Q ~ 300 - 400 (85 - 113 MHz) |
| Microwave Conversion Factor (overcoupled) | > 5 G/sqrt(W) |
| Bandwidth (critcially coupled) | Q < 85 (> 400 MHz) |
To achieve the largest resonator bandwidth, the iris should be at its highest position. However, in some circumstances it may be beneficial to lower the iris to increase the B1e field strength, at the expense of the resonator bandwidth.
Warning
Critically coupling the resonator can lead to significant probe ring-down, with power reflected back to the EPR spectrometer exceeding safe levels. When attempting to critically couple the resonator, make sure to start a low and safe level of excitation power.
Adjusting the Iris Coupling
To adjust the coupling of the resonator, follow these steps:
- Lower the micrometer iris adjustment to the minimum position (down) by turning the micrometer head clockwise. Once the iris is in its lowest position, the resonator will be critically coupled. Do not force the iris mechanism, especially at cryogenic temperatures.
- Change the spectrometer frequency so the resonator dip is all the way to the right. Inserting the sample will cause the frequency to shift to a lower level.
- Insert the sample holder into the resonator.
- While inserting the sample, follow the tuning dip. If necessary, adjust the spectrometer frequency, so the dip is not moving outside the observable region.
- Make sure the sample stick is lowered all the way into the probe.
- Raise the iris by turning the micrometer screw counter clockwise until the desired bandwidth is obtained.
Raising the iris (turning the micrometer screw counter clockwise) will lower the Q-value and increase the resonator bandwidth (see figure above) without changing the resonator frequency.
What’s next?
- Learn about Probe Specifications.