Welcome to the online documentation of the Bridge12 XLP probe for pulsed EPR and ODNP spectroscopy. Bridge12 does not distribute paper manuals with their probes to keep the documentation always up to date. If you have questions, or suggestions for edits please contact us at info@bridge12.com.
The Bridge12 XLP(O) probe is an EPR probe designed for pulsed X-Band (~ 9.5 GHz) EPR spectroscopy based on a loop gap resonator. The probe is optimized for pulsed EPR experiments, which require a large resonator bandwidth and high microwave conversion factors.
This X-Band probe is available in two different configurations:
Both configurations are based on a Loop-Gap Resonator (LGR). When completely overcoupled, the resonator has a large bandwidth, and the high microwave conversion factor guaranties large B1e fields. This makes the XLP resonator the ideal choice for pulsed EPR experiments that require a large excitation bandwidths.
Bridge12 XLP Overview
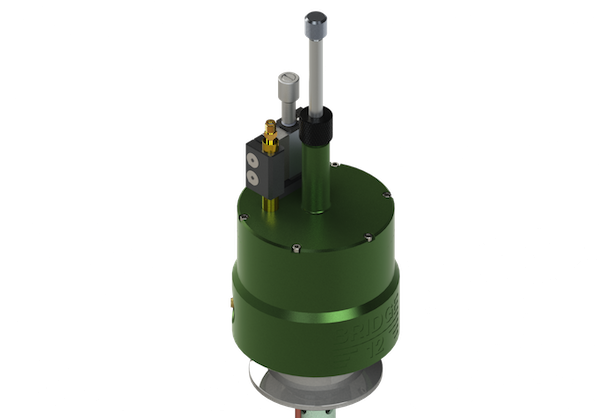
An overview of the Bridge12 XLP probe is shown in the figure shown above. For low-temperature measurements, the probe can be operated inside a cryostat. The Bridge12 XLP is compatible with commonly used cyrostats, such as the Oxford Instruments cryostat model CF935.
The main features of the probe are:
The resonator
Integrated temperature sensor
Baffles along the length of the probe
Electrical connector to connect the temperature sensor to a controller
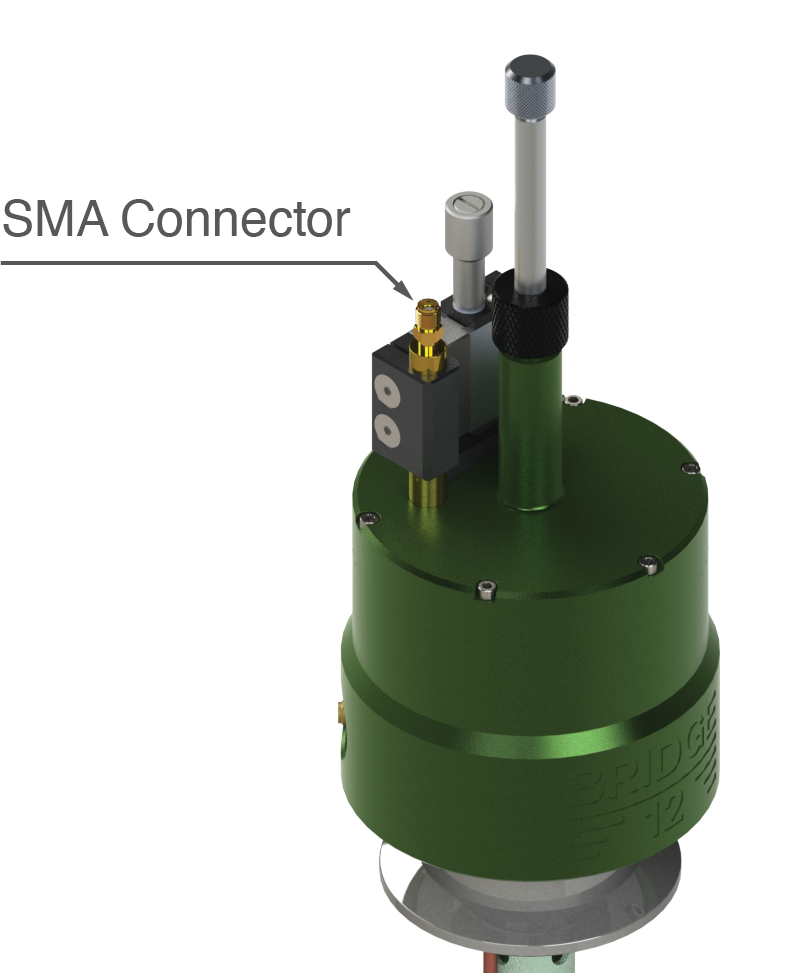
SMA connector
Sample turret with sample stick
Iris adjustment
Optical Access
Optical access to the sample location for e.g. light/laser irradiation is possible in several different ways:
Through the sample holder/stick (for fiber access only).
Free-space access perpendicular to the sample axis (please inquire with Bridge12 about this option).
If you like to use an optical fiber to irradiate the sample using the sample holder/stick (option 1), please contact Bridge12 at info@bridge12.com for further information.
Temperature Sensor
The Bridge12 XLP probe has a built-in, calibrated Cernox temperature sensor. The connector is located at the back of the probe. Please use the cable that came with the probe to connect the probe to the temperature controller.
More information about the pin-out can be found in the section Temperature Sensor.
Please make yourself familiar with the instructions below before attempting to install the probe. At no point should you use any force during the installation process. In general, all threads, screws, etc. are imperial size, not metric. Please use the appropriate tools to fasten screws.
Bridge12 XLP Overview
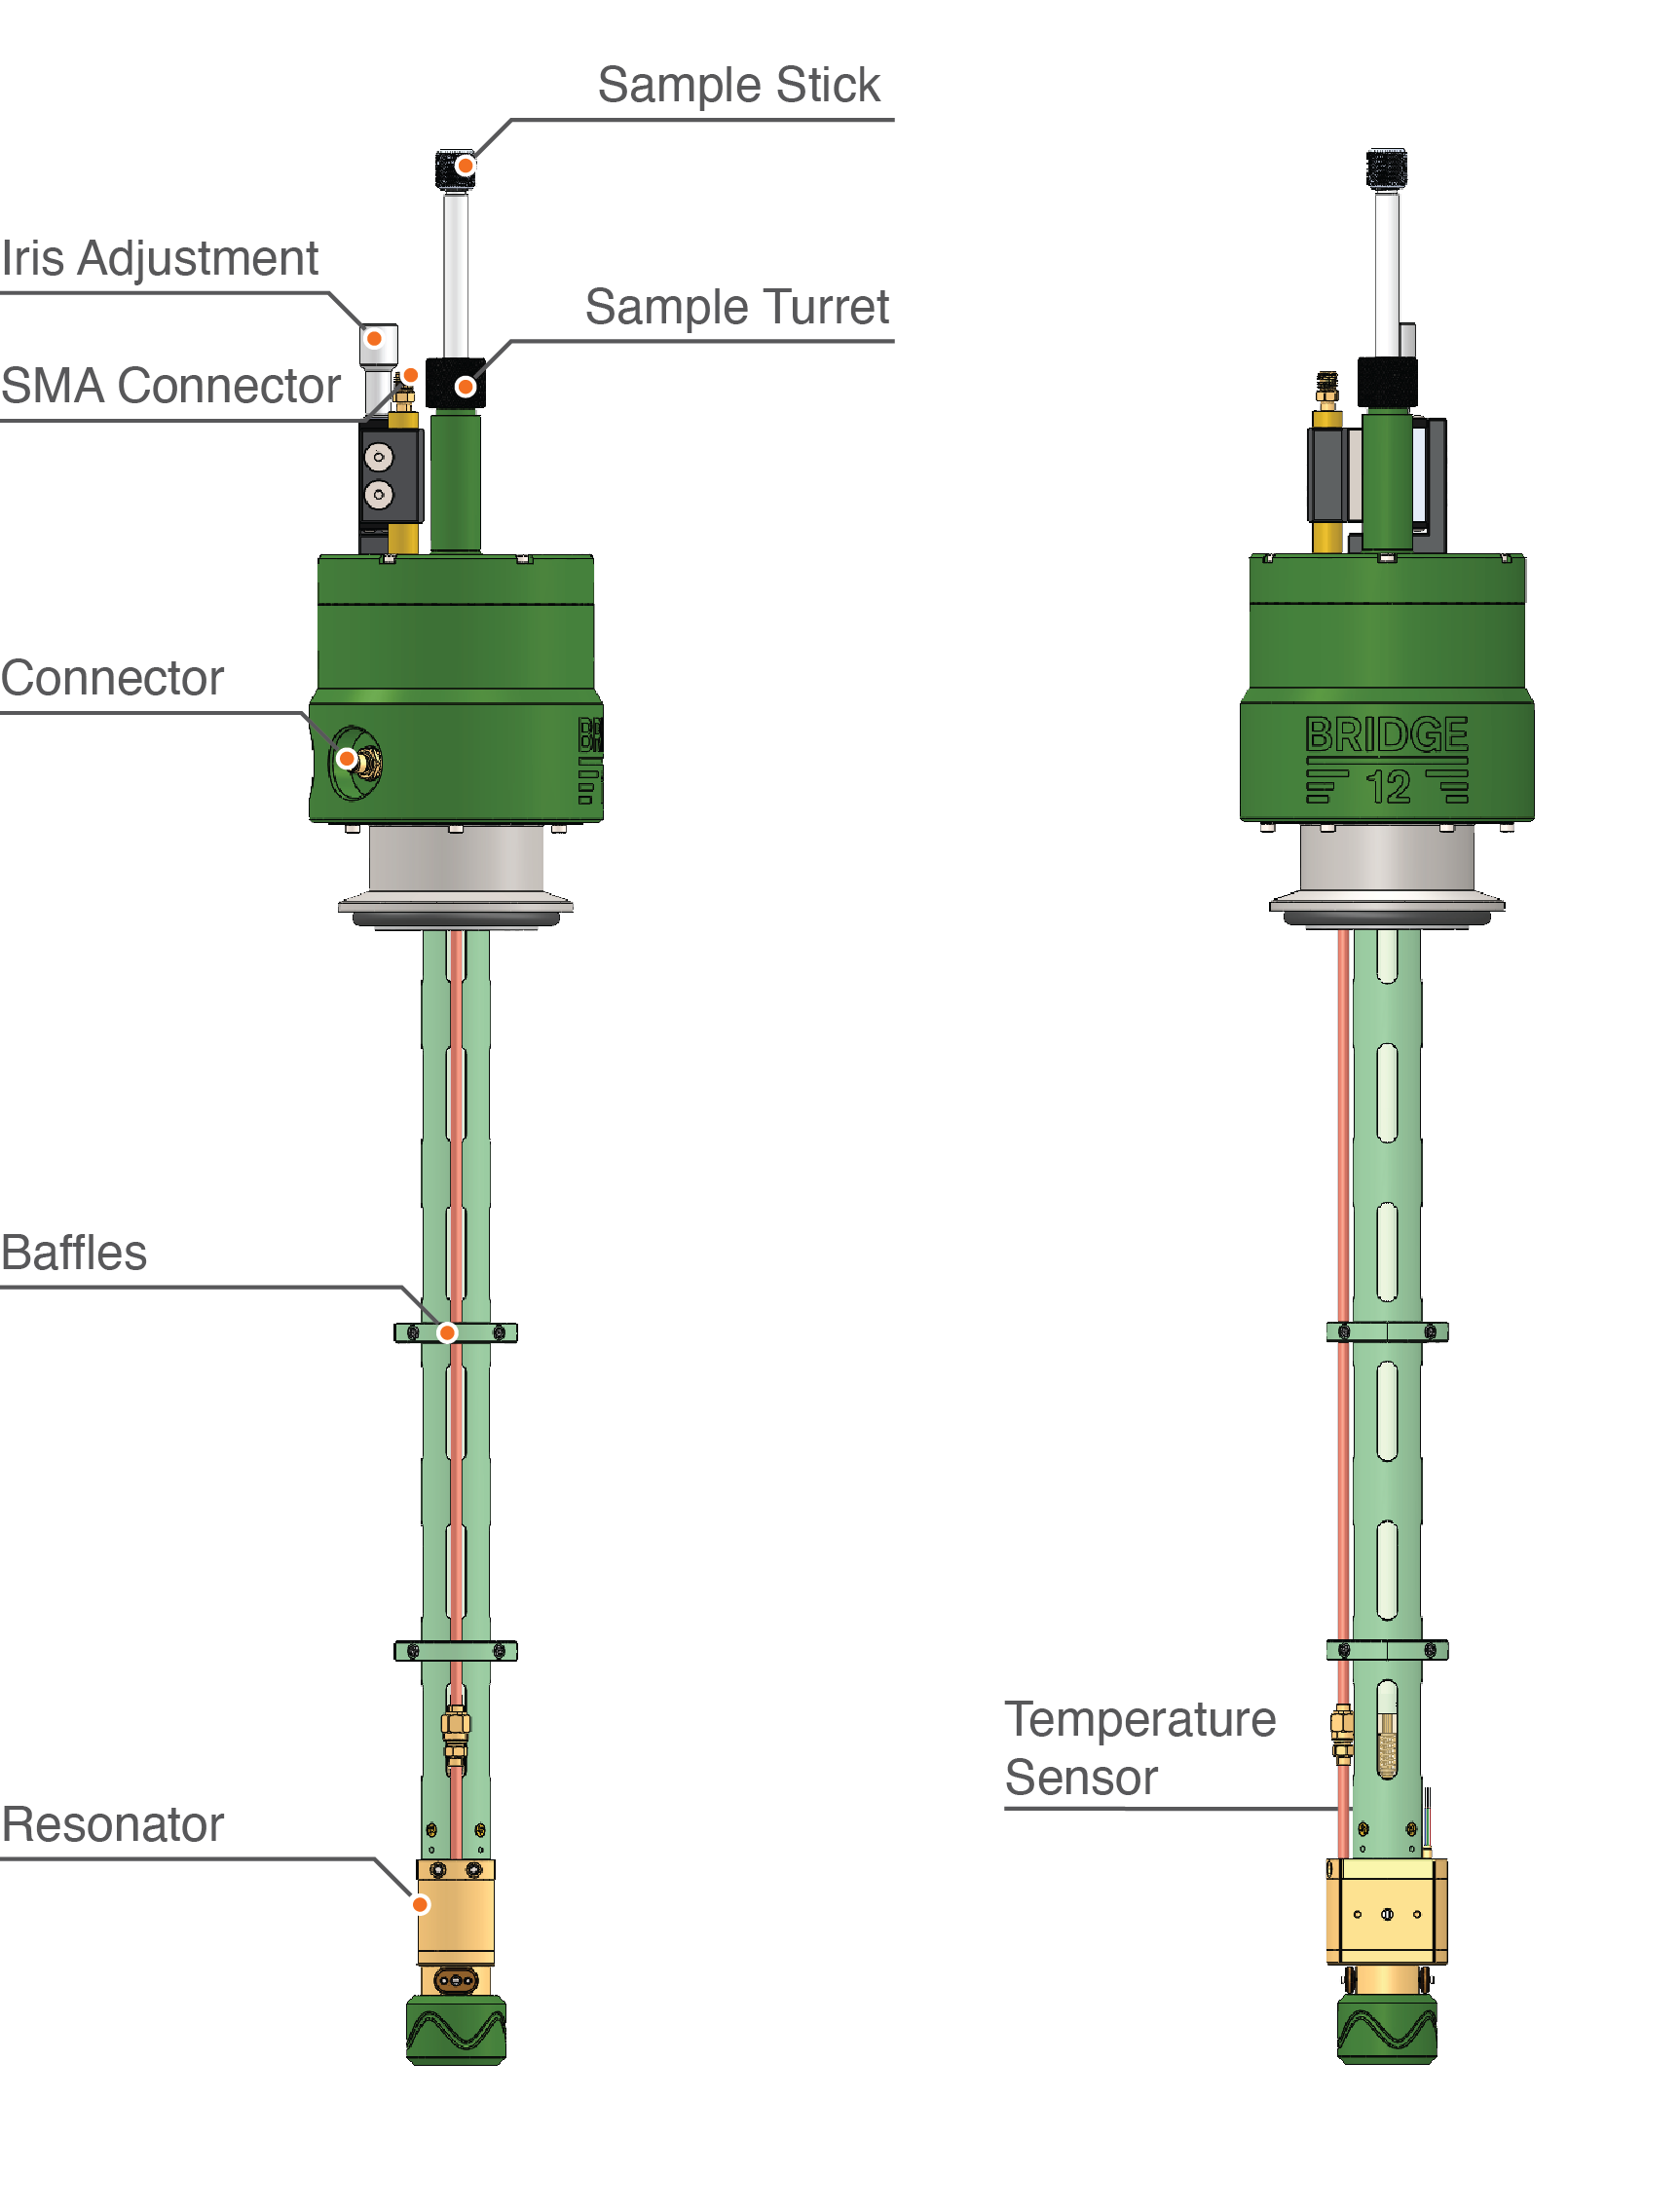
The Bridge12 XLP has a single SMA port to connect the probe to the spectrometer (see figure above). The SMA port is located at the top of the probe. Since the iris coupling is adjusting by moving the coupling loop inside the resonator up and down, we suggest using a flexible SMA cable between the bridge and the probe.
To connect the probe to the spectrometer follow these steps:
Remove plastic cover from SMA connector (typically used for shipping or long-term storage of the probe).
Place probe inside cryostat. If you don’t use a cryostat, place probe in the appropriate support structure.
Turn/orient the probe so the SMA connector and translation stage is pointing to the back and the Bridge12 logo is facing the front. Typically, the EPR bridge is located on the left.
Connect a flexible SMA cable between the EPR bridge and the probe. If your EPR bridge was a WR-90 waveguide port (this will be the case with most older bridges) you first need to connect a WR-90 to SMA adapter.
Tighten the SMA connections with your fingers. Ideally, you should use an SMA torque wrench. Do not use pliers to tighten the connection.
Connect the temperature sensor to the temperature controller.
Warning
Do not use force to tighten the SMA connector. Do not use pliers or regular wrenches to tighten the SMA connection. We recommend using a torque wrench when tightening SMA connections. Torque wrenches for SMA connections are available from DigiKey or Mouser. If you don’t have a torque wrench available please just use your fingers to tighten the connection. Using the wrong tools can lead to permanent damages of the probe.
The BRidge12 XLP probe can except samples up to a maximum OD of 3.0 mm. Vendor links to sample tubes and capillaries can be found on the Cosumables Page.
Mounting the Sample
Please follow the instructions for using the sample stick to mount the EPR sample to the Sample Stick. In general, the distance between the center of the sample and the bottom of the sample holder should be about 1 inch (25.4 mm) (see figure below).
Recommended distance between the center of the sample and the bottom of the sample holder
Inserting the Sample Stick
To insert the sample stick into the probe follow these instructions:
Note
Please keep in mind that these instructions can differ, depending on the type and make of the low-temperature cryostat.
If the cryostat is cooled down, stop the cooling. Wait for the pressure inside the cryostat to reach atmospheric pressure.
If using a purge gas, switch on a slow stream of purge gas.
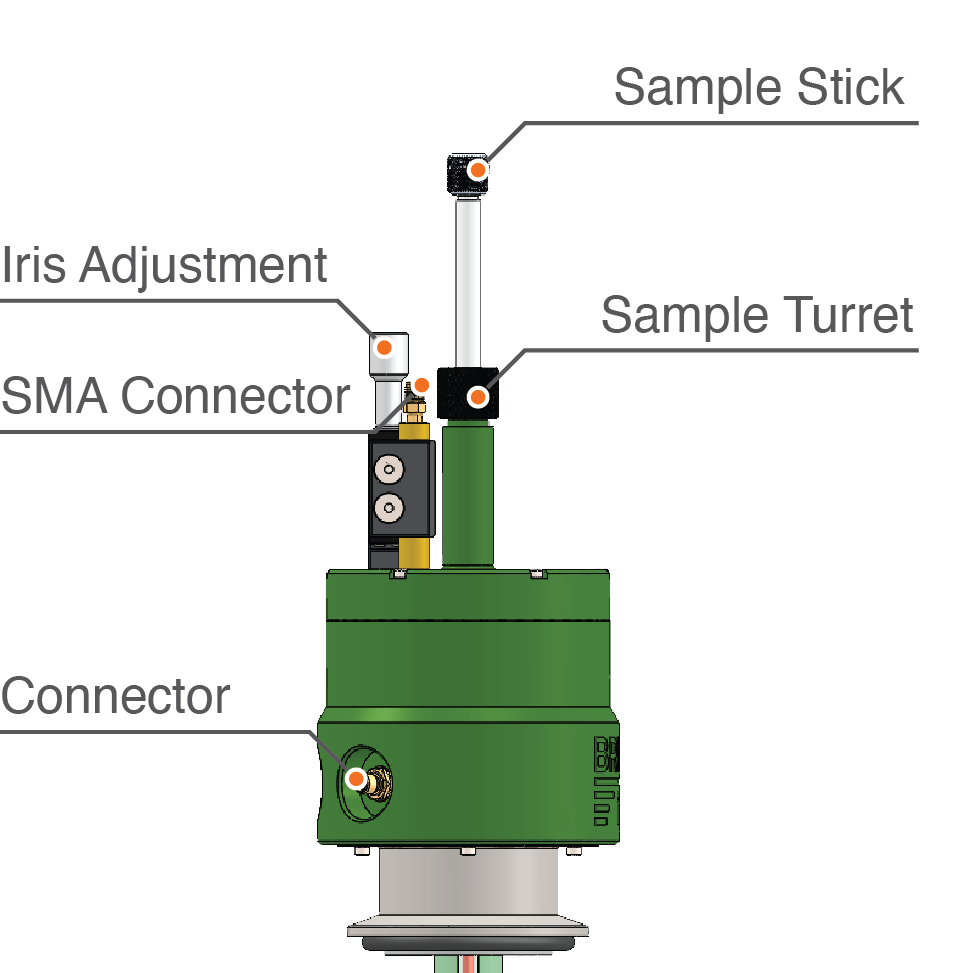
Loosen the nut at the top of the sample turret (see figure above). Depending on the probe the nut may be made from brass, stainless steel, or anodized aluminum. Typically, just loosen the nut should be sufficient, it is not necessary to completely remove the nut.
Pull out previous sample stick or blind plug. If the purge gas is running, there should be no ambient air entering the cold space of the cryostat.
Insert the new sample stick (or blind plug).
Push sample stick all the way to the bottom. If the distance between the center of the sample and the bottom of the sample holder is 1 inch, the bottom of the sample holder will rest on top of the resonator.
Tighten the nut at the top of the sample turret. Please don’t use any tools to tighten the nut.
Start the cooling and wait for the temperature to settle before attempting to tune the resonator.
The Bridge12 XLP is a Loop-Gap Resonator (LGR) for pulsed EPR spectroscopy at X-band frequencies (~ 9.6 GHz).
Pulsed Electron Paramagnetic Resonance (EPR) spectroscopy using high-power microwave pulses or arbitrary waveform generated (AWG) broadband pulses require a large resonator bandwidth (low resonator Q) to avoid distortion of the pulse shape.
However, a large resonator bandwidth often comes at the cost of a reduced microwave conversion factor. Loop-Gap Resonators (LGR) are the preferred choice for pulsed EPR experiments since they have large microwave conversion factors and excellent field homogeneity across the length of the sample. This is especially important when using AWG generated broadband pulses.
Resonator Specifications (Bridge12 XLP-3.0)
Parameter
Value
Resonator Frequency (empty)
9.6 GHz
Resonator Frequency (with sample capillary)
9.5 GHz
Microwave Conversion Factor (critically coupled)
> 3.5 G/sqrt(W)
Bandwidth (critically coupled)
Q ~ 700 (15 MHz)
Microwave Conversion Factor (overcoupled)
> 1 G/sqrt(W)
Bandwidth (critically coupled)
Q < 100 (> 100 MHz)
Maximum Sample Diameter
3.0 mm
Resonator Height
10 mm
Operating Temperature
4 K to RT
Bridge12 XLO
The Bridge12 XLO probe is based largely on the design of the XLP probe but has an integrated NMR coil for solution-state Overhauser Dynamic Nuclear Polarization (ODNP) experiments. The XLO probe has similar specifications as the XLP probe (frequency, conversion factor, etc.) but due to the NMR coil the sample access is limited to 1.2 mmm.