The Sample Stick described in this section is used for most Bridge12 EPR probes (and some DNP probes).
Important
Please, first make yourself familiar with the documentation of the Sample Stick before attempting to load a sample into the probe. All Bridge12 probes come with a standard sample (typically BDPA in polystyrene) to test the probe at room temperature. This is also a great sample to get familiar with the Sample Stick.
New Sample Holder (Spring 2023)
Starting 2023, all Bridge12 EPR probes are shipped with an updated version of the sample holder. If the description provided here does not exactly match the sample holder you have and you have additional questions, feel free to reach out to Bridge12 at info@bridge12.com and inquire about specific instructions for your sample holder.
1 - Overview
Brief overview of the Bridge12 sample stick
Sample Stick Assembly
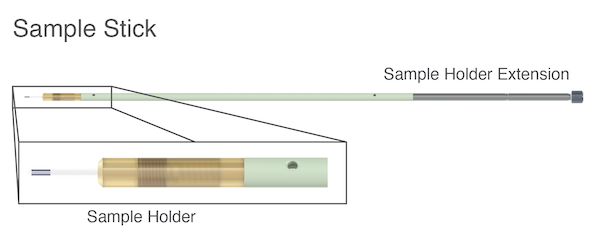
The Sample Stick Assembly consists of two parts (see figure above):
The Sample Holder (bottom part of the Sample Stick)
The Sample Holder Extension (top part of the Sample Stick)
In general, the sample capillary (or sample tube) is held (mounted) by the Sample Holder, which is then screwed on to the end of the Sample Holder Extension. The Cap at the end of the Sample Holder Extension can be easily removed to purge the Sample Stick with the cooling gas (e.g. helium or nitrogen) when inserting the Sample Stick into the probe. An o-ring will seal the Sample Stick. The entire Sample Stick is hollow to accommodate an optical fiber or electrical wires if desired.
The Sample Stick can be used for variety of sample tubes with different outer diameters up to 4 mm. For larger sample sizes up to 5 mm or smaller capillaries a custom modified sampler holder is required. Please contact Bridge12 at info@bridge12.com if you would like to request a customized Sample Holder.
For cold or cryogenic storage, the Sampler Holder with the sample capillary can be unscrewed from the Sampler Holder Extension to be stored separately.
2 - Sample Stick
The Bridge12 sample stick assembly
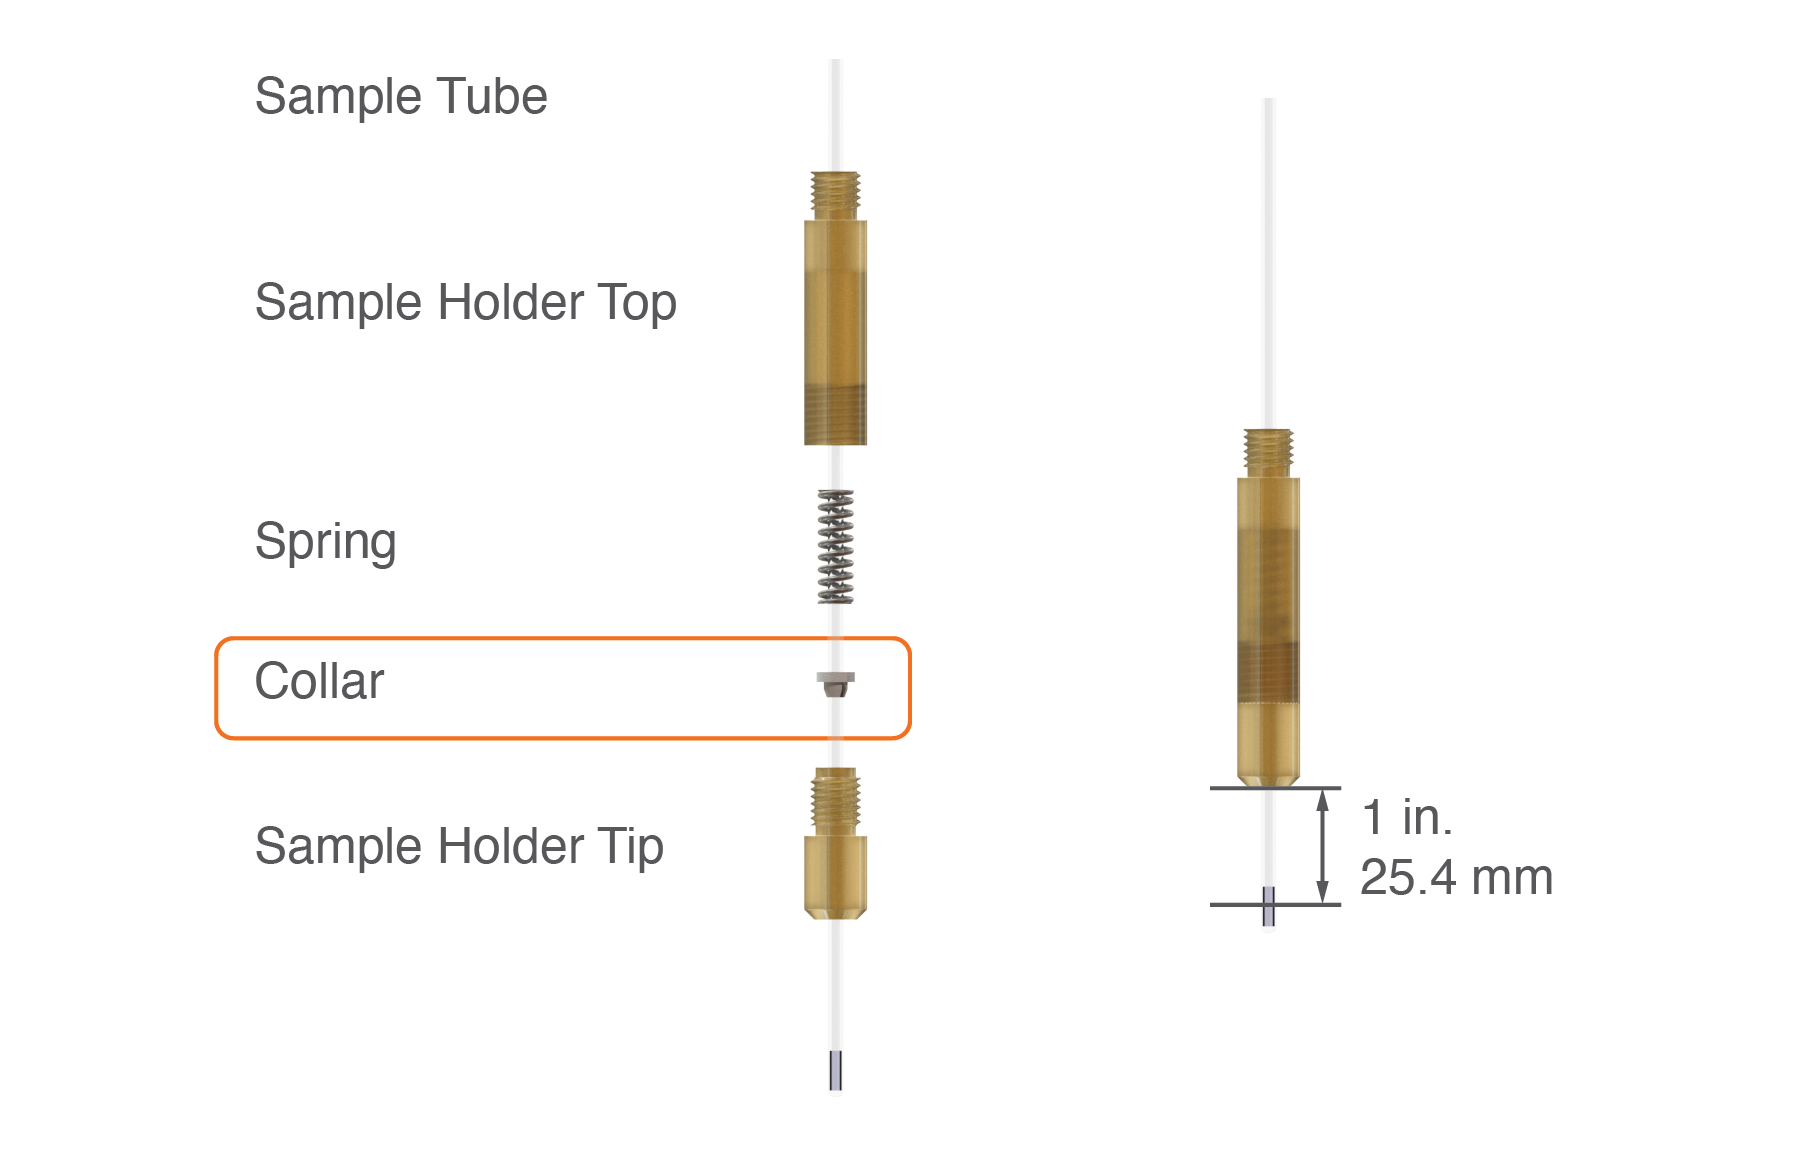
Sample Stick Assembly
The complete sample stick assembly is shown in the figure about. The sample tube is mounted in the Sample Holder. The entire assembly is designed to easily insert the sample into the probe at any operating temperatures.
Sample Holder
Sample Holder Parts
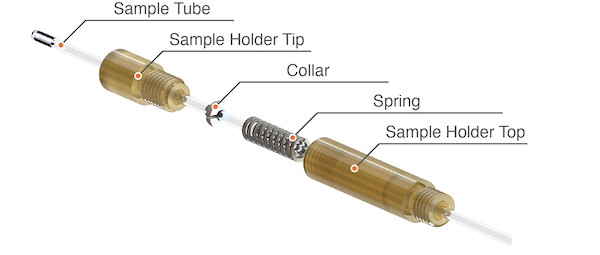
In addition to the sample tube the Sample Holder assembly consists of four different parts:
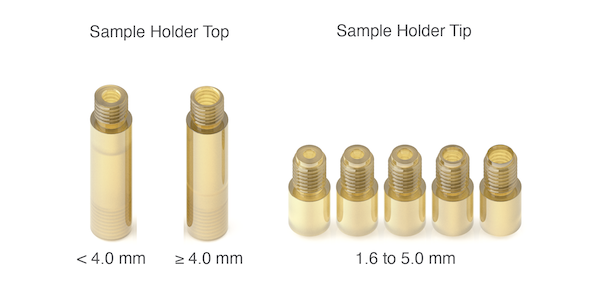
To accomodate different samples tube diameters, the Sample Holder comes with a set of different Sample Holder Tips and Sample Holder Tops.
Sample Holder Parts
Two different sizes for the Sample Holder Top are included. Use the smaller Sample Holder Top (left side, figure above) size for sample tube with an OD of < 4.0 mm. For sample tube sizes of 4.0 mm and larger use the Sample Holder Top with the larger bore size (right side, figure above).
The Sample Holder Tip comes in sizes between 1.6 mm and 5 mm. Use the correct tip size according to the sample tube diameter.
Recommendation
Each sample tube and Sample Holder Tip show variations of the ID and OD. We recommend, test-fitting the capillary to the Sample Holder Tip before loading the sample into the capillary.
Sample Holder Extension
Sample Holder Parts
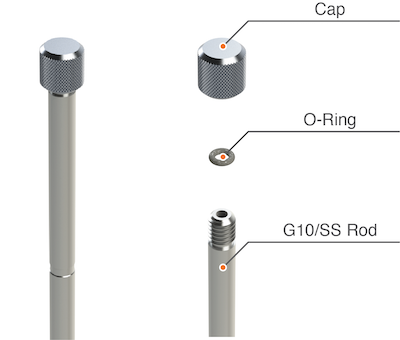
The Sample Holder Extension (shown above) consists of 3 different parts:
The Cap of the sample stick can be unscrewed to vent the insight of the Sample Holder Extension when operating the probe at low temperatures. An o-ring is used to seal the top of the extension.
By default and if not otherwise specified at the time of ordering the probe, the probe will be delivered with a closed Cap. However, to feed electrical wires or an optical fiber to the sample, the Cap can be replaced with one that has a center hole. For more information contact Bridge12 at info@bridge12.com
3 - Inserting and Changing a Sample
How to insert and change a sample
Preparing the Sample
Depending on the nature of your sample, either fill the sample tube with a powder, or pipette a liquid sample into the sample tube. In either case, check out the resonator specific recommended sample height.
For liquid samples, make sure all liquid made it to the bottom of the sample tube. Avoid any air bubbles when filling the sample into the sample tube. For powdered samples, tap the bottom of the sample tube several times to make sure all powder is at the bottom of the probe.
Warning
Use adequate safety precautions when handling your sample, especially when handling toxic materials.
Assembling the Sample Holder
To get started, the sample tube needs to be mounted in the Sample Holder.
Sample Stick Assembly
To mount the sample tube into the Sample Holder, follow these steps:
Select the correct Collar size, Sample Holder Tip and Sample Holder Top size according to the sample tube OD
Start with sliding the correct size teflon Collar over the sample tube. Make sure the Collar and the sample tube are oriented as shown in the figure above. The sample tube should slide in from the top to avoid damaging the Collar
Insert the sample tube with the Collar into the Sample Holder Tip
Slide the Spring over the sample tube. The orientation of the spring is not critical
Slide the Sample Holder Top over the sample tube. The entire assembly should like the one shown in the figure above
Begin screwing the Sample Holder Tip into the Sample Holder Top
As you screw in the Sample Holder Tip into the Sample Holder Top, the spring will compress the teflon collet. Depending on the number of turns the spring is compressed more or less. Try not to overtighten the assembly. You should still be able to slide the sample tube through the Sample Holder assembly.
Warning
Do not overtighten the Sample Haolder Tip. The Sample Holder should have a firm grip on the sample tube. Overtightening the Sample Holder Tip could break the sample tube.
Recommended Sample Height
By adjusting how much the capillary is sticking out of the Sample Holder Tip the user can control how far the sample is inserted into the resonator. In general, Bridge12 requires that the distance between the center of the sample and the bottom of the Sample Holder Tip is about 1 inch (25.4 mm).
This is shown in the figure above (right side).
Removing the Sample from the Sample Holder
To remove a sample tube/capillary from the sample holder, slightly loosen the end cap and pull the capillary out from the bottom of the sample holder.
In general, it is not necessary to disassemble the Sample Holder unless a sample tube gets stuck or breaks and the Sample Holder needs to be cleaned
Inserting the Sample into the Probe
Once the sample tube is securely mounted on the sample stick, it can be inserted into the probe through the sample holder turret. The sample holder turret assembly includes a knurled nut, washer (ferrule) and an O-ring as shown in the figure below.
To insert the sample follow these steps:
Stop the sample cooling (if running) and wait for the pressure in the cryostat to reach atmospheric pressure
Loose the knurled knut of the turret (It is not required to completely unscrew the knurled nut)
Remove the existing Sample Stick (or blind plug if present).
Make sure to insert the Sample Stick all the way to the bottom of the resonator. The Sample Stick should rest on the bottom of the Sample Holder Tip. The Sample Stick has a mark at the top. This mark should line up approximately with the top of the knurled nut
Under some circumstances, it may be easier to first assemble the sample stick with the knurled nut, the ferrule and the O-ring separately outside the resonator and load this assembly into the resonator. For this, additional spare parts are provided with the probe.
To remove the sample, reverse the above steps.
Warning
Do not force the sample stick into the probe (especially when operating at cryogenic temperatures). Forcing the sample stick into the resonator can potentially break the sample tube/capillary and case permanent damage to the probe.
4 - Recommended Sample Amount and Position
Recommended sample amount and position for optimum performance
Important
Please check the recommended sample amount/height and position for the resonator you are planning to use. Each resonator will have its own optimum sample height. If you don’t find your particular resonator model in the list below, please contact Bridge12 at info@bridge12.com
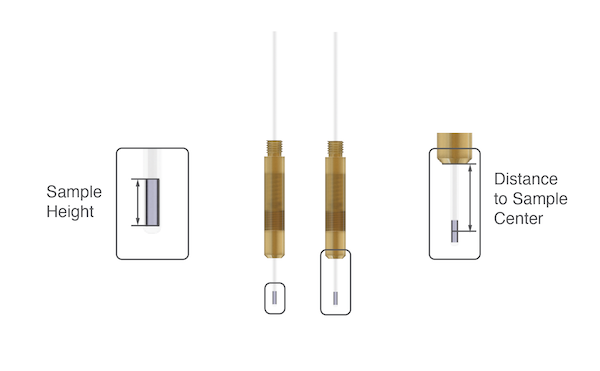
When preparing a sample and mounting it in the Sampler Holder to factors are important to consider:
Sample Height: The sample height depends on the active volume of the resonator and is specific to the resonator model.
Distance to Sample Center: For the majority of Bridge12 resonators, the distance to sample center is 1 in. (25.4 mm). The distance may differ for some older resonator models. If you are not sure about the distance please contact Bridge12 at info@bridge12.com
Sample Amounts and Position
Resonator Model
Sample Tube OD
Recommended Sample Height (mm)
Distance to Sample Center
QLP
1.6 mm
> 5 mm (4.8 μl sample volume)
25.4 mm(1)
Footnotes
(1) Early prototype versions of the QLP resonator use 12 mm as the distance to sample center.
5 - Consumables
Consumables for Bridge12 EPR probes
Sample Tubes
For EPR spectroscopy we recommend using sample tubes manufactured by SP Wilmad-LabGlass. The following tube sizes can be used with the sample holder:
Other sample tubes can be used too, as long as they fit into the sample holder.
Warning
Only use sample tube/capillary sizes that are recommended by Bridge12 Technologies for the particular probe. Using sample tube/capillary that are too big for the probe can result in irreparable damage to the probe, the sample or both.